
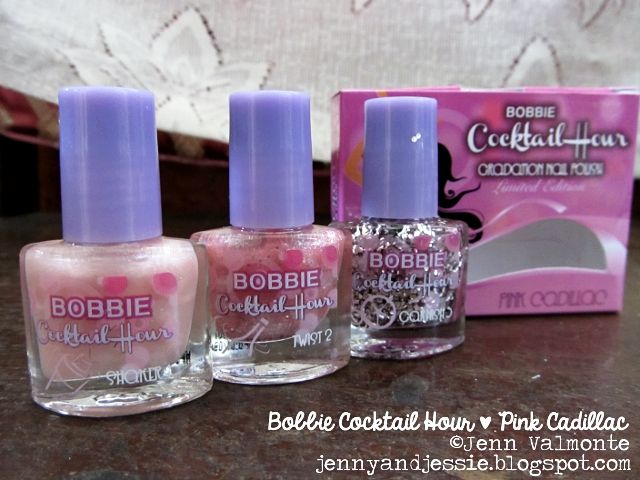
When I last went to Landmark (TriNoma), I was only planning to buy the two remaining bottles I needed to complete the Bobbie Holoprism collection. However, my "addiction" to nail polish is difficult to control, and aside from buying what I needed, I went to buy other nail polishes, including this new product from Bobbie Nail Polish called "Cocktail Hour," a set nail polish to achieve the gradient effect. I think this is Bobbie's answer to Etude House's Juicy Cocktail gradation nails kit. Well, I think Etude House's kit cost about 300+ pesos, so Bobbie's kit costing just 80 pesos was a good reason for me to buy it. Of course, with that price comes the very minor setback - each of the bottles in the kit only has 4ml. (these bottles remind me of Mwah! nail polishes, by the way). The time I bought this, there were only two shades available - pink and green. I do love pink a lot, so it was the easy choice...and such a good timing because I could use this for my Valentine's Day nail art.

So...this is how my nails look like on Valentine's Day. With so much blog posts about Etude House's gradation nail kit and with a lot of videos on YouTube about doing the gradient effect, I am sure you probably know how to use it, but if you're new to this kind of nail polish kit,the box printed an instruction guide at the back, which I want to quote:
- Apply a thin coat of Bobbie Base Coat to nails to prevent streaking and discoloration. Let dry.
- Apply a thin coat of SHAKER1 polish across the entire nail. Allow this layer of polish to dry completely before moving onto the next layer.
- Apply the TWIST2 polish beginning at the cuticle and working toward the center of the entire nail only. Again, allow this layer of polish to dry completely before moving onto the next layer.
- Dab GARNISH3 on the nail tips to achieve the desired fading effect.
- apply a final top coat of Bobbie Top Coat Super Fast Dry once all layers of your colored polish have dried. Let dry.
Okay... some parts of the instruction guide I don't quite agree with. My points:
- SHAKER1 nail polish is very sheer, so applying just one thin coat wasn't really enough. I actually used two medium coats on my nails and the white dome base on my thumb can still be seen (see picture below)
- Step 3 said, "Apply TWIST2 polish beginning at the cuticle and working toward the center of the entire nail." Step 4 said, "Dab GARNISH3 on the nail tips to achieve the desired fading effect." I was left with a question... If I apply TWIST2 from my cuticle toward the center of the nail and dab GARNISH3 at the tips, then that pretty much covered the first layer of nail polish I made and wouldn't create the gradient effect.
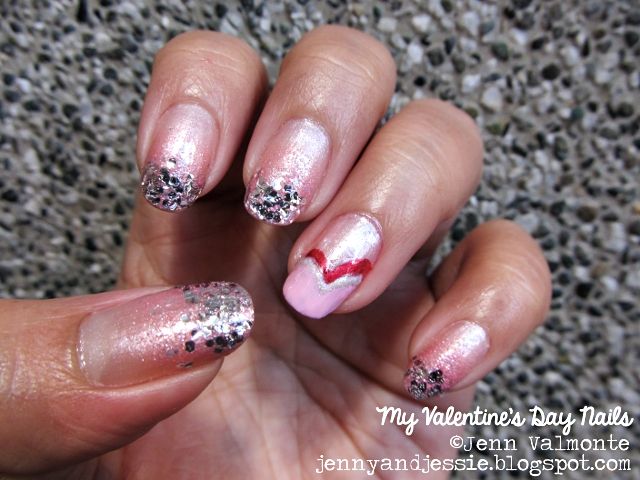
So... what I did on my nails - I applied two medium coats of SHAKER1 then using a small cut up sponge, I applied some of TWIST2 directly on the sponge and dabbed it on my nails starting from the tips working 3/4 of the nails, then dabbed the glitters from GARNISH3 bottle.
Overall, I liked this product. The SHAKER1 and TWIST2 have very nice formula, and if I don't like to do the gradient effect, I can use each of these polishes separately. I do love the TWIST2 polish... it has glitters that are so thin that weren't so bumpy. However, I am not really crazy about the GARNISH3 glitters. It's nice that the bottle does have a lot of glitters, but there weren't enough lacquer inside to help scatter the glitters. Also, I don't find it impressive that the glitters were colored silver. This wanting to achieve a gradient effect, I was hoping the glitters were slightly dark pink so it will have three layers of pink across the nail.
I also liked that this has a soft tone, so even if my tips were glittery, it wasn't really loud.
Talking now about my accent nail. I originally saw it through Joanna's site, Whoa Nails! which she called Heartsy Tipsy Nails. I actually hoped to that nail art last year, but I was still not addicted to nail polish that time and I thought it was quite outrageous to buy three different shades of pink to achieve the look. Well, now that I have enough nail polishes to create the look, I went on to do it...but just on my accent nail because I admit my hands aren't that talented to create a good copy.
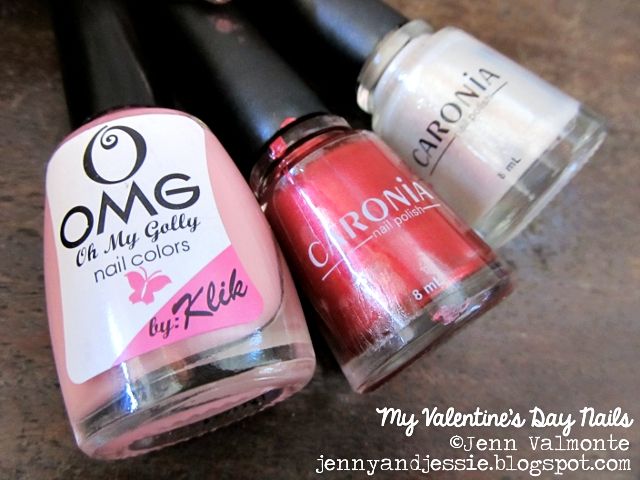
The base on my accent nail used the SHAKER1 polish, then for the tips I used Caronia Red Pearl, Caronia Marquise, and OMG First Date. It wasn't a good heartsy tipsy, I know... but I think I deserve even just a B for the effort. Hahaha.
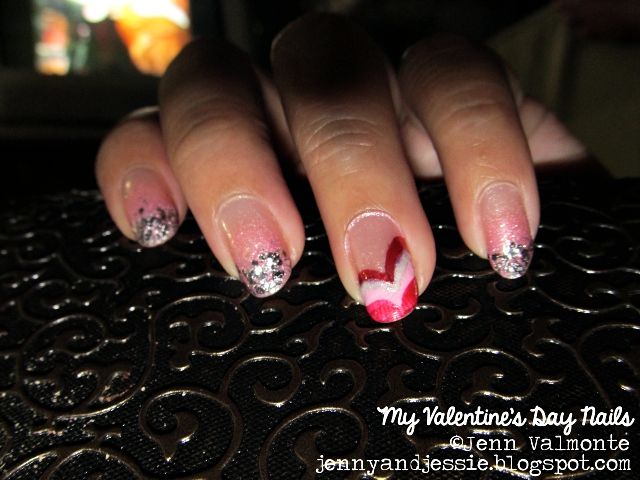
Before leaving the house on Valentine's Day, I had this sudden urge to add more curve on the tips of my accent nail using Careline Fantasy Red. What I learned about doing the Heartsy Tipsy... I should use nail polishes with awesome opacity and could get away with just one pass. Caronia and Careline worked good, but OMG was quite liquidy that I needed to make two coats.
No nail art for me after this (as I don't know of any occasion for me to do so), so after this, all the nail files posted here will be swatches of solo nail polishes.

No comments:
Post a Comment
We are grateful to have you here.